What Spark Plugs Do
Spark plugs are a critical component in your vehicle’s engine that ignite the fuel-air mixture, leading to combustion. These components need to be in good working order for your engine to run efficiently.
Function:
- Create the electric spark for ignition
- Aid in the transfer of heat from the combustion chamber
Anatomy of a Spark Plug:
- Insulator: Protects and insulates the electrode
- Electrode: Conducts the electric current
- Metal Casing: Screws into the engine’s cylinder head
Types of Spark Plugs:
- Copper: Good conductivity but lower durability
- Iridium: Longer lifespan, better performance at a higher cost
- Platinum: Balances conductivity and durability
Checking Spark Plugs:
- Visual Inspection: Look for wear or damage.
- Gap Size: Use a gap gauge to check and adjust to your vehicle’s specifications.
- Color: Tan or gray indicates a healthy engine; other colors may signal issues.
Service Life:
- Varies by plug type; copper (20,000 miles), platinum (60,000 miles), iridium (up to 100,000 miles).
Common Issues:
- Oil on plugs: May indicate an engine leak.
- Black soot: Suggests running “rich” (too much fuel).
Preparing for Inspection
Before inspecting your spark plugs, ensure you have the right tools on hand and are aware of safety measures.
Gathering Tools
To effectively check the spark plugs, you need:
- Socket wrench: Specifically, a spark plug socket.
- Spark plug gap tool: To measure and adjust the gap.
- Wire brush or spray-on plug cleaner: For removing debris.
- Inspection light: To illuminate the work area.
Safety Precautions
While inspecting, your safety is paramount:
- Wear gloves: Protects hands from dirt and minor abrasions.
- Eye protection: Prevents debris from getting in your eyes.
- Ground the vehicle: Ensures it is not running and the ignition is off to avoid shocks.
- Work in a well-ventilated area: Reduces inhalation of any fumes or airborne dirt.
Inspecting the Spark Plugs

Assessing the condition of your spark plugs is a crucial step in maintaining the health of your vehicle’s engine. By following the outlined steps, you can ensure your spark plugs are functioning properly and your engine is running efficiently.
Removing the Spark Plugs
- First, identify your vehicle’s engine layout and locate the spark plugs, which are typically attached to thick rubbery wires.
- Gently remove the wire off the first spark plug using a spark plug wire puller or by a twisting motion to prevent damage. Be sure not to pull the wire itself but rather the boot that covers the plug.
- Use a spark plug socket with a ratchet and extension to unscrew each spark plug. Turn the ratchet counterclockwise to loosen the plug.
- Once loose, remove the plug by hand and place it in a tray to avoid dirt contamination.
Evaluating Plug Condition
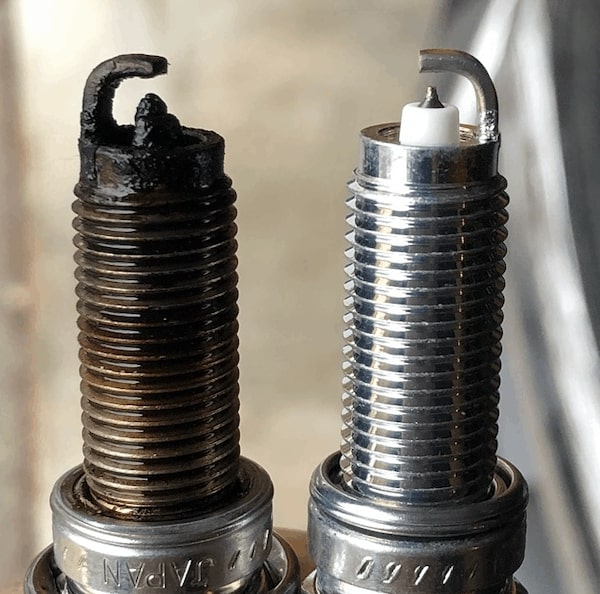
- Visual Inspection: Look for signs of wear or damage. A normal plug should have a light tan or gray insulator and minimal electrode wear.
- If the insulator is white and blistered, your engine may be running too hot.
- Black, sooty deposits might indicate a rich fuel mixture or poor combustion.
- Electrode Condition: The electrode should be intact and have a relatively flat wear pattern.
- Excessive wear or rounded electrodes suggest a plug past its lifespan.
- Gap Measurement: Check the gap between the electrodes with a gap gauge.
- The correct gap specification can be found in your vehicle’s service manual.
- Adjust the gap if necessary by bending the side electrode carefully.
Interpreting Inspection Results
After inspecting your spark plugs, you must know how to read the signs they show. This tells you about the health of your engine and the potential need for adjustments.
Assessing Electrode Wear
- Visual Inspection: Begin by looking at the spark plug electrode, which is the small piece of metal protruding from the end.
- If the electrode has a flat top, the plug is in good condition.
- Measuring Electrode Gap: Use a gap tool or feeler gauge to measure the distance between the center and side electrodes.
- A gap that is too wide or too narrow can affect engine performance.
- Refer to your vehicle’s specifications for the correct gap measurement.
Checking for Deposits
- Types of Deposits: Examine the plug for any deposits. Brown or grayish-tan deposits can indicate normal operation.
- Signs of Trouble: Black, oily deposits may suggest oil leaking into the combustion chamber.
- White or blistered deposits could hint at an overheating condition.
- Use a brush to gently clean off light deposits.
- Heavier deposits may require replacement of the spark plug.
Recommendations After Inspection
After inspecting your spark plugs, carefully consider their condition to decide on the next steps for optimal vehicle performance.
When to Replace Spark Plugs
- Mileage: Replace your spark plugs based on your vehicle manufacturer’s recommendation, often between 30,000 to 100,000 miles.
- Wear and Tear: Look for physical signs like electrode damage or wear, and replace if they are visible.
- Performance Issues: If your vehicle has a rough idle, trouble starting, or decreased fuel efficiency, this may signify that your spark plugs need replacing.
Reinstalling Spark Plugs
- Thread by Hand: Start threading the new spark plugs by hand to prevent cross-threading.
- Proper Torque: Use a torque wrench to tighten spark plugs to your vehicle manufacturer’s specified torque.
- Check Connections: Ensure that spark plug wires or ignition coil connections are secure and free from corrosion before reassembling.