2015 Chevy Captiva Replacement Bulbs
Here are the proper bulbs that your Captiva needs, straight from GM.
| Function | Bulb Number |
| Back Up Lamp | 921 |
| Front Fog Lamp | H11 |
| Front Turn Signal/Parking Lamp | 3157K |
| High-Beam | 9005 or HB3 |
| Low-Beam/DRL | 9006 or HB4 |
| License Plate | 168LL |
| Rear Stoplamp, and Tailamp | 7443 |
| Rear Turnsignal | 3757 NAK |
Source: 2015 Captiva Owner’s Manual Page 10-30

2015 Captiva Headlight Replacement Procedure

- Open the hood.
- Remove the filler panel. The fasteners are marked “1” on diagram 1 (directly above).
- Remove the headlight assembly. There are three screws that hold it in place, they are marked “2” on diagram 1.
- Pull the headlight straight towards yourself. This releases the retaining studs from the headlight grommets.
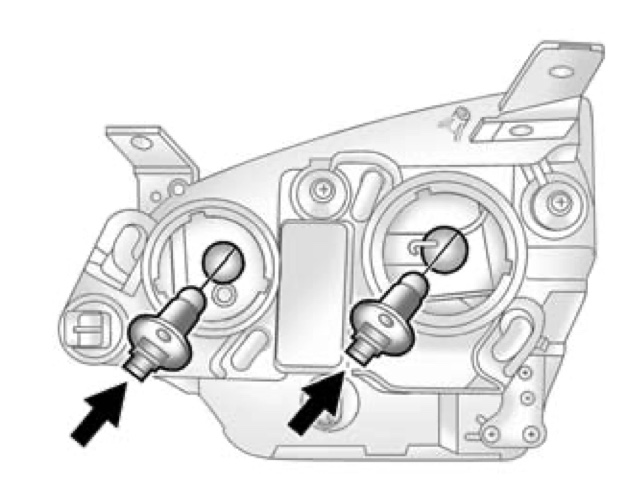
- Disconnect the electrical connector from the bulbs before turning them, this saves the harness from unnecessary abuse (See Diagram 2 ⬇️).
- Rotate the bulbs counterclockwise to remove them.
- Put the new bulb in the headlight assembly at the same location the old bulb was when it came free. Turn it clockwise until it seats.
- Repeat steps one through five in reverse order.
2015 Captiva Fog Lamp Replacement Procedure
- Look at the fog light.
- Reach behind it and feel the bulb.
- Turn it counterclockwise. It’ll come right out.
- Disconnect it from the wiring harness
- Replace the bulb with the new H11 bulb.
- Put it back in the fog lamp assembly and turn it counterclockwise.
- Reconnect the electrical connection.
Replacing the fog lamp bulbs (if so equipped) is really easy. The bulbs are exposed behind the bumper assembly. Taking it out will not be a challenge. Putting it back in without the car on a lift or jack can be. Connecting the bulb to the electrical harness before putting it back into the fog lamp assembly will make it go a little bit easier. Just take care not to damage the harness.
2015 Captiva Turn Signal and Parking Lamp Replacement Procedure
- Open the hood.
- Remove the filler panel. The fasteners are marked “1” on diagram 1.
- Remove the headlight assembly. There are three screws that hold it in place, they are marked “2” on diagram 1.
- Pull the headlight straight towards yourself. This releases the retaining studs from the headlight grommets.
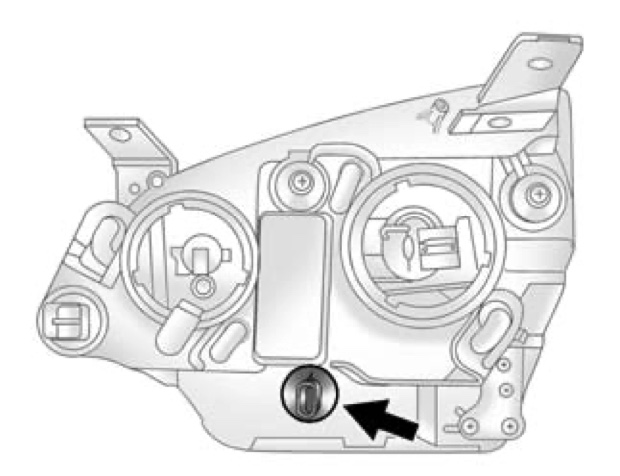
- On the second diagram ⬇️ you’ll see the turn signal/parking lamp socket. Turn it counterclockwise.
- Remove the bulb from the socket.
- Replace the existing bulb with a new 3157K bulb.
- Put the socket back into the headlamp assembly and turn clockwise.
- Reverse the disassembly procedure to get the new
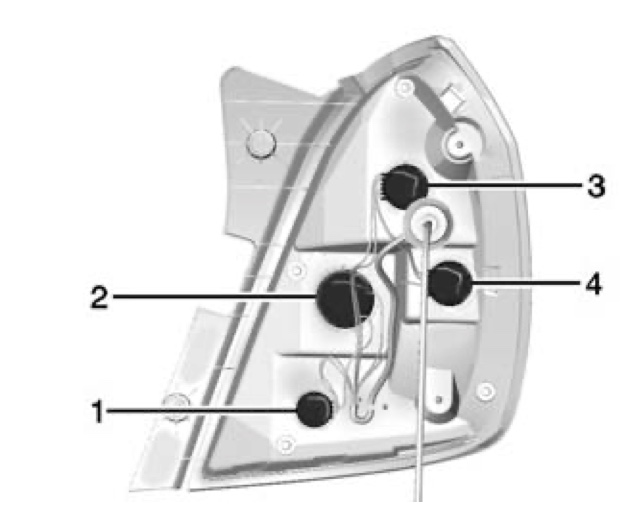
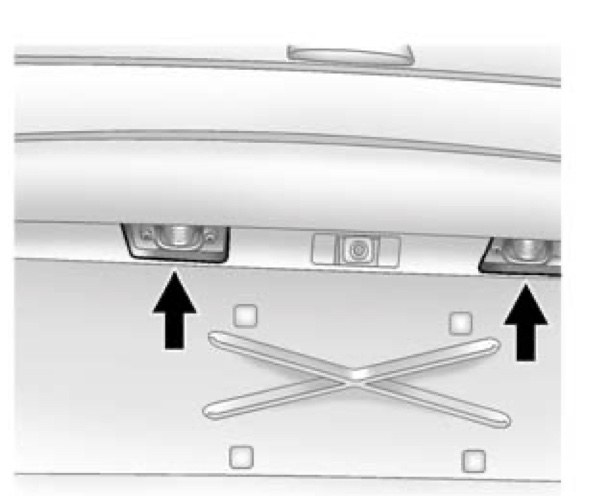
2015 Captiva: Taillamp, Turn Signal, Stop Lamp, and Back-UP Lamp Replacement Procedure
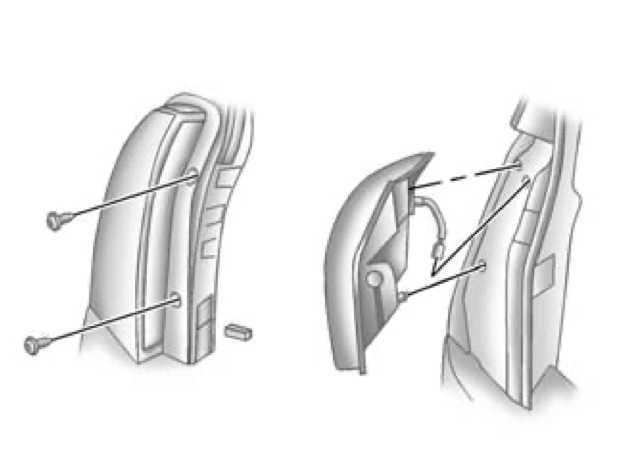
- Open the rear hatch.
- There are two screws holding the taillamp assembly. Remove them. See the diagram above for their location.
- Pull the taillamp assembly straight back.
- Use the diagram below to determine which socket to remove.
- Turn the bulb socket in question counter clockwise to remove it.
- Pull the bulb out of the socket.
- Replace the bulb and reassemble the taillamp assembly by reversing the procedure outlined above.
2015 Chevy Captiva License Plate Light Replacement Procedure
- There are two screws that hold each of the two license plate lights into place.
- Remove the screws.
- Pull the license plate light through the fascia opening.
- Turn the bulb counterclockwise to remove it.
- Put new bulb into place and turn clockwise.
- Reverse the disassembly procedure.
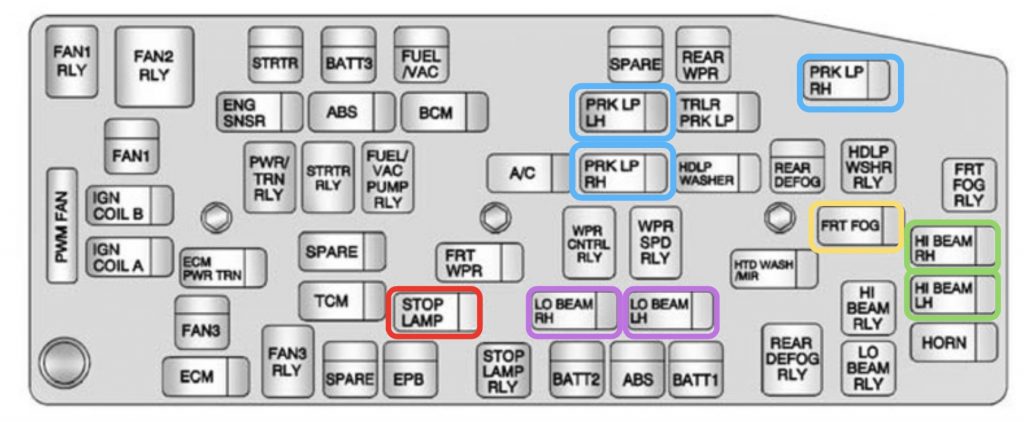
2015 Captiva Headlight Fuse Location
The location for all of the 2015 Chevy Captiva’s headlight related fuses is in the fuse box that resides under the hood. It’s right by the battery. Directly above it.
You’ll need to pop off the protective dust cover in order to gain access to the fuse panel.
The fuses for the lighting system are highlighted in the image below.